


A couple months ago, I decided I wanted to update my backsplash but thought I was stuck with what I had. Then I was hit by a revelation! I decided to have the 4 inch granite backsplash taken off and replace it with a DIY backsplash wallpaper project. It was glorious! Having no backsplash is better than having those 4 inch high backsplashes in my opinion!
PS. Don’t ever hesitate on your intuition. What seemed like something that would be arduous, turned out to be easy! The backsplash was glued on, so using a crowbar and elbow grease was all it took! Here’s my disclaimer though, do have someone knowledgeable take a look before you start tearing and destroying just in case you have any complications so you don’t end with a half finished project!

DIY Pro Tip: Take Your Time
Then the inevitable happens when you embark on any home project. Time gets away from you. You get busy and the project sits there unfinished. I also took off the outlet covers and those were bare for months as well.
Sometimes I think the lapses of time between starting and finishing a project is good, maybe even necessary. It was during this limbo period that I really committed to what to deciding to do what I wanted to do with this space. I decided against peel and stick tile because I wanted to try something new and different.
Peel and stick tile is already tried this wonderful hack in my in between stage of waiting for the bathroom renovation. Ever the design renegade, I wanted a challenge. And this was a good one!
A New Look for Our Backsplash
I searched for creative ideas to adorn the blank walls. At one point I thought about real tile. But honestly, why waste money on a tide over project? It simply wasn’t worth my energy.

One night as I was sourcing wallpaper for a client’s bathroom, I had my a-ha moment!
What about wallpaper? Most of my backsplash area isn’t used in a messy manner. It basically provides counter space for my precious coffee maker, mixer and kitchen accessories. That being said, I did have a concern about the range. This would definitely need something water and grease proof. Never one to give up easily, I decided I would figure something out along the way.
DIY Wallpaper Backsplash: Wallpaper Design
There are so many temporary removable wallpaper options, I went down a rabbit hole of options.
However one design stuck with me over and over again. Rebecca Atwood has long been a favorite of mine. I love her pillows and bedding. I knew someday I wanted her wallpaper in my home as well.

When I saw these Double Dashes that went vertical, it reminded me of vertical backsplash in a very abstract manner. So I ordered some and when it arrived, I was excited and yet it felt daunting. We had to get the pattern lined up perfectly. If not, it would simply be a disaster.
Cue Travis aka Mr. Meticulous, he carefully cut the paper so that each would line up perfectly to the next.

Here is what you need:
- Wallpaper Paste from Home Depot or any hardware store
- Paint Roller
- Box Cutter or Blade
*If your wallpaper is prepasted, you would replace wall paper paste with water.

Installing Our DIY Wallpaper Backsplash
The space between the upper cabinets and countertops didn’t give us enough room to install the paper easily. We had to contort our bodies every which way to make sure the wall paper installed straight and then get out the dreaded bubbles.

So I found an angle that helped me achieve that easier and faster. However it wasn’t very flattering. This is proof, my friends, that you gotta do what you gotta do to achieve a successful home improvement project!
Another pro tip: you must have another person helping you. It is a must.

Whether it’s one person holding up the top of the wallpaper so it doesn’t flap down while you are trying to line things up on the bottom or getting out bubbles, you need a friend to help.
Travis and I took turns helping each other out. It made for a nice bonding time with much laughter! And here is me fitting in some ab work while wallpapering. Who woulda thunk!?

Booking and Smoothing Our DIY Wallpaper Backsplash
For those of you that feel very intimidated by non pasted wallpapering, I empathize with you. However once you get over that initial feeling, it is very exciting! And way easier than you think!

A pro tip: booking the wallpaper after you apply glue/paste for a few minutes is very hopeful! The glue saturates the paper and the adhesive becomes stickier. But don’t wait too long! It will stick together eventually. I made that mistake a few times! Ha!

Once the glue is saturated, carefully un-book the ends and apply the wallpaper to the wall.
Flat walls are best. That being said, we have dry wall and no bumps showed through at all! Often times directions are based on the most ideal conditions, but if you are a risk taker like me, I accommodate certain instructions according to what my situation is. I knew the drywall wasn’t stucco so it was worth a try. And happy to report, it was fine!
Once the paper is on the wall, use a lot of force and rub the bubbles away either with a wallpaper smoother or I just used my bare hands with a lot of force and that worked out best for me.

Sometimes too much apparatus isn’t helpful but Travis liked the smoother. So, to each his own! As long as the job gets done right? Once we got our system down, it took about 2 hours to finish. The prep is what took the longest. So I would say this is a one day DIY for the amount of space you see.
Save the Wallpaper with a Plexiglass Win
And here is the finished update! If you thought I couldn’t pull this off because too much grease and food would splatter, welp, I have a solution!

I used glue dots and it stuck to the corners of the plexiglass and wallpaper amazingly well. Plexiglass is a wonderful solution because it is easy to clean and will not crack like glass! It’s also far enough away from the burners so there is no risk of it melting either!

So that’s two kitchen hacks for your outdated kitchen when your budget is on the small side!
My Favorite Reason Why This Works
I adore Rebecca Atwood’s fresh and organic take on textiles. It’s always so soothing and calming to look at, experience and enjoy!

So if you were to ask me my favorite part of this project? It’s definitely the beauty of Rebecca’s art work in here. I love how whimsical and fun the pattern took my kitchen too!


It immediately felt like a different kitchen already! Annnnnd you guys know I just can’t stop there right??
Finishing Touch with a New Pendant Light
One of my favorite design secrets is to source lighting and furniture at children and teen categories in a brand I love if they offer it.
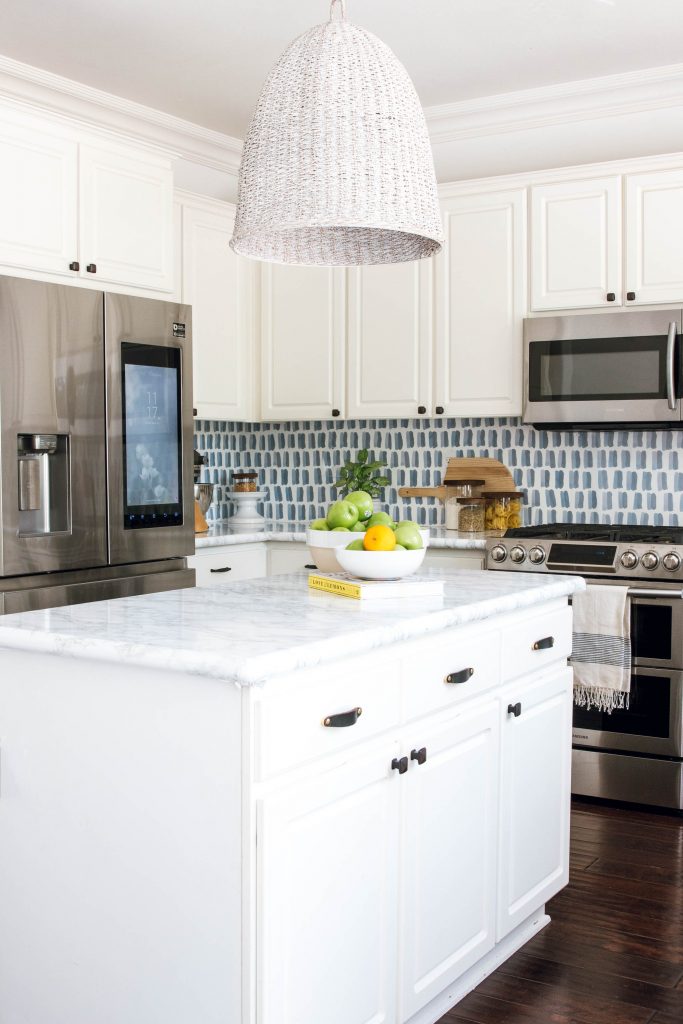
This Restoration Hardware gray woven pendant originally was going to be above my free standing tub in my bathroom. However it was too light in tone and became washed out with the white tiled walls.

So it sat in my bedroom for a couple months. Then when I had the bright idea to revamp the kitchen, I held up this pendant and voila, this is the home it’s meant for!

Ahhh, I LOVE this new view! It makes me so happy that we are able to change things up in our haven with a lil effort. That’s all it takes my friends! A great idea (sometimes scary and risky) and some elbow grease.

I will tell you what I tell myself all the time, what’s the worst case scenario? Spend time and money to patch a mistake up however you gained that much more experience into your next project.

That is what we call growth! And there isn’t a price tag for that!
Happy day!
Anita


+ show Comments
- Hide Comments
add a comment